OIDC: Identity and Microsoft Entra ID
Overview
This document provides step-by-step instructions for integrating Microsoft Entra ID (formerly Azure AD) as an Identity Provider (IdP) with OneAdvanced Identity using OpenID Connect (OIDC).
Pre-requisites
Before starting, ensure you have the following:
- Customer Admin access for an Organization in OneAdvanced Identity
- A Microsoft Entra ID tenant with admin access
- Access to Azure Portal (https://portal.azure.com)
Configure Microsoft Entra ID as an OIDC Identity Provider
Step 1: Register an Application in Entra ID
- Log in to Azure Portal (https://portal.azure.com)
- Navigate to Microsoft Entra ID → App registrations
- Click New registration
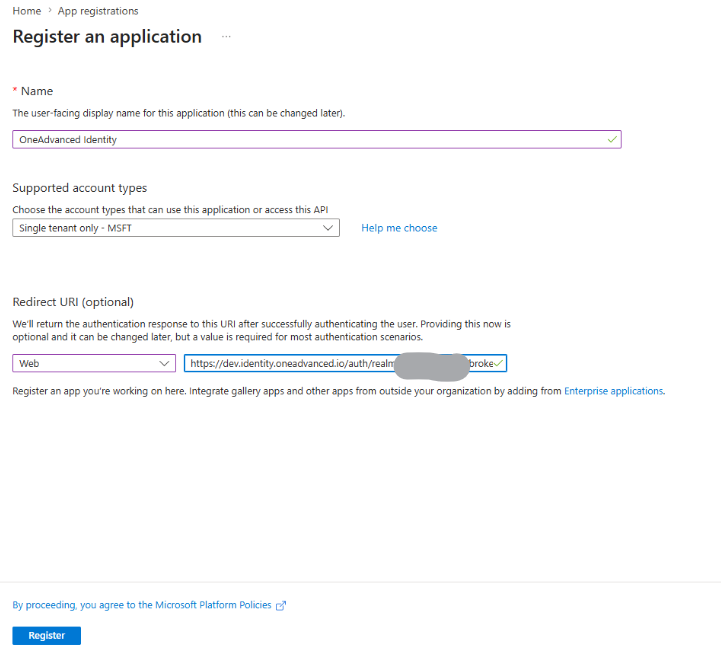
- Configure the application:
- Name: Any descriptive name
- Supported account types: Select based on your requirements:
- Single tenant (recommended for most organizations)
- Redirect URI:
- Platform: Web
- URI: https://identity.oneadvanced.com/auth/realms/{your org-reference}/broker/{federation-alias}/endpoint
Note: Replace{your-org-ref}with your organization reference and{federation-alias}with the alias you'll configure in OneAdvanced Identity
- Click Register
Step 2: Configure Authentication Settings
- In your registered application, go to Authentication in the left menu
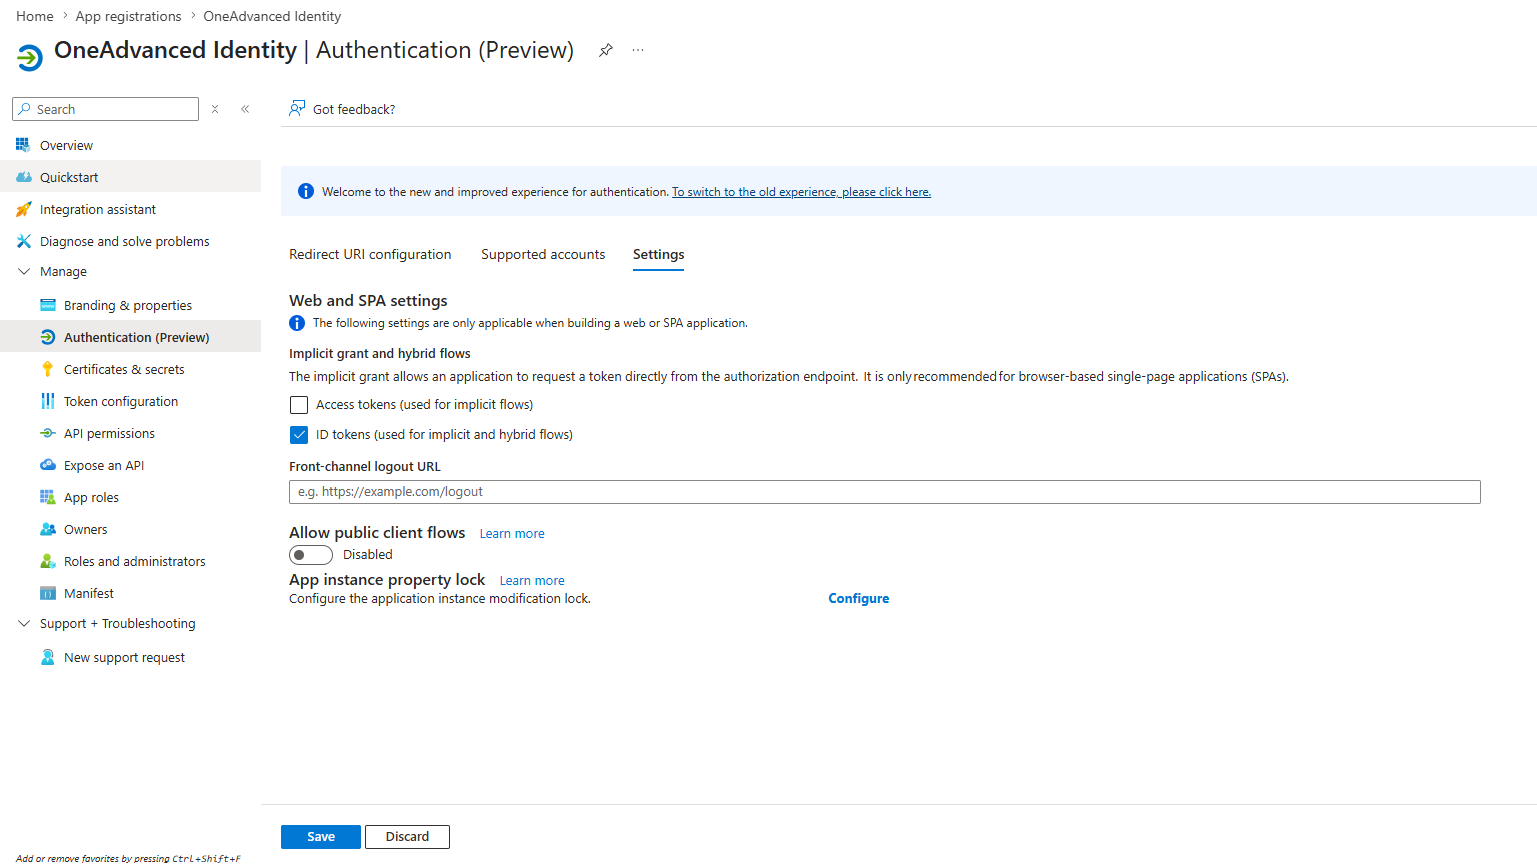
- Under Implicit grant and hybrid flows, enable:
- ID tokens (used for sign-in)
- Click Save
Step 3: Create Client Secret
- Go to Certificates & secrets in the left menu
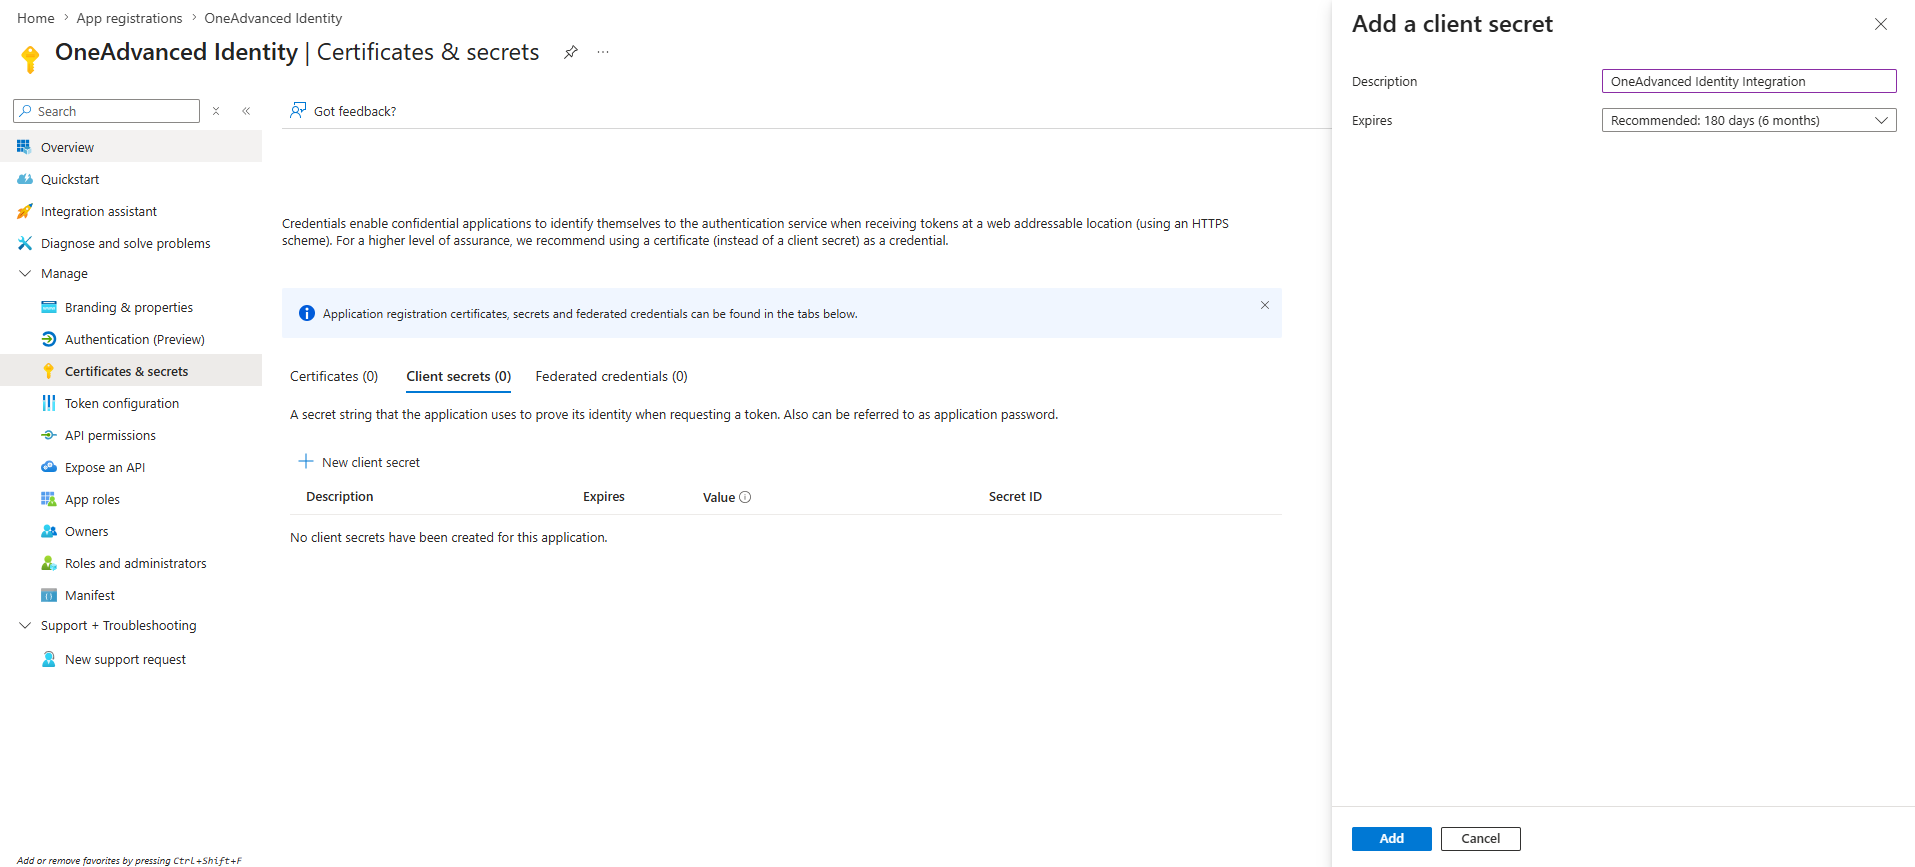
- Under Client secrets, click New client secret
- Add a description (e.g., "OneAdvanced Identity Integration")
- Select an expiration period
- Click Add
Step 4: Gather Required Configuration Values
From your Entra ID application, collect the following values:
- Go to Overview page of your app registration
- Note down:
- Application (client) ID - This is your Client ID
- Directory (tenant) ID - This is your Tenant ID
- Configuration URLs :
- Authorization URL: https://login.microsoftonline.com/{tenant-id}/oauth2/v2.0/authorize
- Token URL: https://login.microsoftonline.com/{tenant-id}/oauth2/v2.0/token
- Logout URL: https://login.microsoftonline.com/{tenant-id}/oauth2/v2.0/logout
- User Info URL: https://graph.microsoft.com/oidc/userinfo
- JWKS URL: https://login.microsoftonline.com/{tenant-id}/discovery/v2.0/keys
- Issuer: https://login.microsoftonline.com/{tenant-id}/v2.0
Note: Replace{tenant-id}with your actual Directory (tenant) ID
Configure OneAdvanced Identity OIDC Federation
Step 1: Create OIDC Federation in MyWorkPlace
- Log in to https://apps.oneadvanced.com
- Navigate to Organization Manager
- Click Edit for the organization where you want to configure federation
- Click Single sign-on (SSO) tab
- Click Configure your own
Step 2: Configure Federation Details
Fill in the following fields:
General Settings:
Field | Value | Notes |
Friendly name | Microsoft Entra ID | This is displayed to users during login |
Alias | entraid-oidc | Use lowercase, no special characters (used in callback URL) |
First login flow | automating pairing | Recommended for automatic user provisioning |
Post login flow | (leave empty) | Optional |
Type | OIDC | Select OpenID Connect |
GUI order | 1 | Display order if using multiple federations |
Always use | true or false | If true, users are always redirected to this IdP |
Trust email | true | Recommended - emails from Entra ID are verified |
OIDC-Specific Settings:
Field | Value | Notes |
Authorization URL | https://login.microsoftonline.com/{tenant-id}/oauth2/v2.0/authorize | Replace {tenant-id} with your tenant ID |
Token URL | https://login.microsoftonline.com/{tenant-id}/oauth2/v2.0/token | Replace {tenant-id} with your tenant ID |
Logout URL | https://login.microsoftonline.com/{tenant-id}/oauth2/v2.0/logout | Replace {tenant-id} with your tenant ID |
User Info URL | https://graph.microsoft.com/oidc/userinfo | |
Client ID | {your-client-id} | Application (client) ID from Entra ID |
Client Secret | {your-client-secret} | Secret value copied earlier |
Issuer | https://login.microsoftonline.com/{tenant-id}/v2.0 | Replace {tenant-id} with your tenant ID |
Default Scopes | openid | Required scopes for user information |
Prompt | (leave as Unspecified) | |
Validate signatures | Enabled | Important for security |
Use JWKS URL | Enabled | Recommended over static keys |
JWKS URL | https://login.microsoftonline.com/{tenant-id}/discovery/v2.0/keys | Replace {tenant-id} |
- Click Create
Step 3: Configure Attribute Mappers
After creating the federation, you need to map Entra ID claims to OneAdvanced Identity user attributes:
- In the federation tile, click Configure → Mappers tab
- Click Add mapper and create the following mappers:
Name | Mapper Type | Claim | User attribute name |
Email Mapper | Attribute Importer | ||
First Name Mapper | Attribute Importer | given_name | firstName |
Last Name Mapper | Attribute Importer | family_name | lastName |
Username Mapper (Optional) | Attribute Importer | preferred_username | username |
- Click Add after configuring each mapper
Test the Integration
Step 1: Verify Configuration
- Ensure the federation appears as a tile in the Single sign-on (SSO) tab
- Check that all mappers are correctly configured
Step 2: Test User Login
- Navigate to your OneAdvanced Identity login page
- You should see a button/option for Microsoft Entra ID (or your configured friendly name)
- Click the federation button
- You will be redirected to Microsoft login page
- Enter your Microsoft credentials
- After successful authentication, you should be redirected back to OneAdvanced Identity
You have successfully integrated Microsoft Entra ID as an OIDC Identity Provider with OneAdvanced Identity. Users can now authenticate using their Microsoft credentials through OpenID Connect.