Identity
Admins
Federated authentication
Making sure your users only use federated single sign-on to authenticate
Federating Identity with Azure Active Directory
How to add or replace an x509 certificate for Azure Active Directory federations
Managing Authorities for SSO Domain Access
OIDC: Identity and Microsoft Entra ID
Configuring multi-factor authentication (MFA)
Identity and MFA FAQs for admins
Password policy
Resetting passwords
User roles and permissions
Creating and managing users
Manage Organisation Co-branding
Onboarding new users with welcome emails
Adding custom content to welcome emails
Creating and managing custom scopes
Add Login URLs to your Organisation
MFA - mandatory for Admins
Unlock user account
Setting up a SAML Client
An Introduction to Multi-Factor Authentication & Single Sign-On
Identity and MFA FAQs
OneAdvanced Single Sign-on login process when using an authenticator app
OneAdvanced Single Sign-on login process when using email for authentication
OneAdvanced Single Sign-on login process for federated accounts
OneAdvanced Identity login using username
User Journey for EasyPass (Passkeys)
Security questions
How to help keep your OneAdvanced account safe and secure
Integrations
OneAdvanced AI
Getting started
Introducing OneAdvanced AI
How does OneAdvanced AI work?
Benefits of using OneAdvanced AI
Limitations of using OneAdvanced AI
Definition of terms
Prompts
Getting started with prompts in OneAdvanced AI
Prompt engineering
Avoiding Common Pitfalls and Errors
Using Prompts in OneAdvanced AI
Using OneAdvanced AI to Summarise a Document
Using OneAdvanced AI to Simplify Information
Using OneAdvanced AI to Compare Documents
Using OneAdvanced AI to Create Visuals Using Data
Private Spaces
Intelligent Chat Agents
Introducing Intelligent Chat Agents
Accessing Intelligent Chat Agents
Using Intelligent Chat Agents
Intelligent Chat Agents Catalogue
Administration
FAQs
Web Search
Platform
Helpful how-to guides
How to stop unwanted time-outs
How To - Add a Spreadsheet or Chart to your Desk
How To - Add Youtube Videos to a Desk
How To - Add a Spotify Playlist to a Desk
How To - Add Microsoft Stream Videos to a Desk
Admin
Desks
Applets
Applets Overview
Advanced Financials Applets
Setting up Advanced Financials Applets
Advanced HR Applets
Clear Review Applets
Contract Management Applets
Countdown Applet
Desk Notes Applet
iFrame Applet
My Link/Links Applet
RSS Feed Applet
Ideas Applets
Tasks
Data Platform
Data Platform FAQs
Data Platform (Bring Your Own BI/Data Share) - Connection Options
Data Platform (Bring Your Own BI/Data Share) - User Licence Assignment Administration
Data Platform (Bring Your Own BI/Data Share) – How to Connect Microsoft Power BI to OneAdvanced Data Platform
Data Platform (Bring Your Own BI/Data Share) - OAuth Client Credentials Service Users
Data Platform (Bring Your Own BI/Data Share) - Snowflake ODBC Connector Configuration Guide
Data Platform (Bring Your Own BI/Data Share) - Connecting Microsoft Excel to Snowflake Using ODBC
OneAdvanced Mobile app
How to install the OneAdvanced mobile app on your device
Instructions: Adding OneAdvanced Mobile App to Microsoft Intune Company Portal
Licencing
- All topics
- Licencing
- Licence Management
Licence Management
Overview
The Licence Module allows Customer Admins and User Admins to view and manage product licences allocated to their organisation. Using this module, admins can:
- View licensed products
- Review licence details
- Assign or manage user access to licensed products
- Perform bulk licence assignments for large numbers of users
This guide explains how to use the Licence Module effectively.
Accessing Licence module
- Log in to the platform with Customer Admin or User Admin privileges.
- Navigate to the Licence module from system setting.
- The Licence List page is displayed by default.
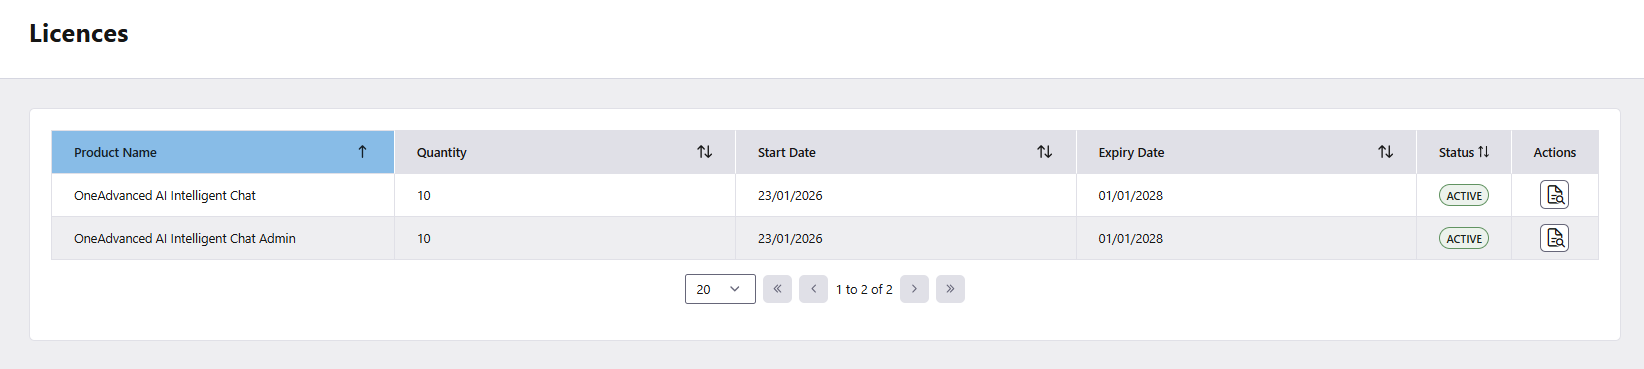
Licence List Page
The Licence List page provides an overview of all products licensed to your organisation.
3.1 Licence List Details
For each licensed product, the following information is displayed:
- Product Name – Name of the licensed product
- Quantity – Number of seats available (or unlimited, if applicable)
- Start Date – Date when the licence becomes active
- Expiry Date – Date when the licence expires
- Status – Current licence status (e.g. Active, Expired)
- Actions – Option to view detailed licence information
- Select View Licence from the Actions column to open the licence details page.
Viewing and Managing a Licence
The View Licence page allows admins to manage user access for a specific licensed product.
Licence Seat Types
Licences can be created with one of the following seat configurations:
- Unlimited Seats – No restriction on the number of users who can be assigned
- Limited Seats – A specified quantity of seats available for assignment.
Assigning Users to a Licence
If the licence allows user allocation (unlimited or limited seats):
- Open the View Licence page.
- Select Add Users.
- Choose the users who should have access to the product.
- Save the changes to apply the licence assignment.
The system will ensure that assignments do not exceed the available licence quantity (for limited-seat licences).
Allocate Licence to All Users (Unlimited Seats Only)
If a licence is created with Unlimited Seats, admins have an additional option called Allocate to all users.
When this option is enabled:
- The licence is allocated to all existing users in the organisation.
- Any new users added to the organisation in the future will also receive the licence.
- Admins do not need to manually assign users to the licence.
How to Enable "Allocate to all users"
- Open the View Licence page for an unlimited-seat licence.
- Locate Allocate to all users checkbox on the licence summary section.
- Select (check) the option.

This feature is useful when a product should be accessible to everyone in the organisation without manual user management.
Bulk Licence Assignment
For organisations with a large number of users, the Licence Module provides a Bulk Assign Licence option.
Download Bulk Assignment Template
Navigate to the Imports tab on the licence details page and click import button to download template
Download the provided import template.
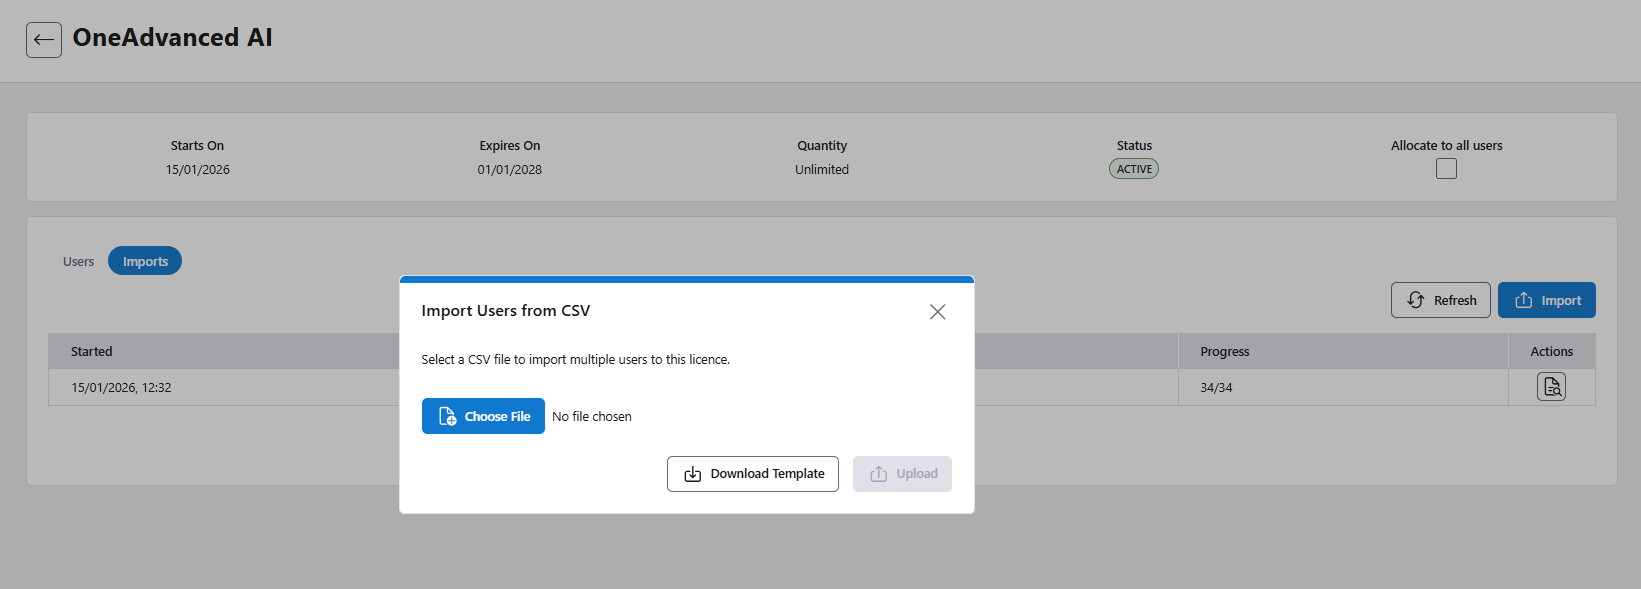
Preparing the Import Template
- The template supports the following user identifiers:
- Advanced ID
- Email Address
- Both Advanced ID and Email
- Add the required user details into the template for all users who need access to the product.
- Upload the completed template.
- Once uploaded, you can also check status and progress
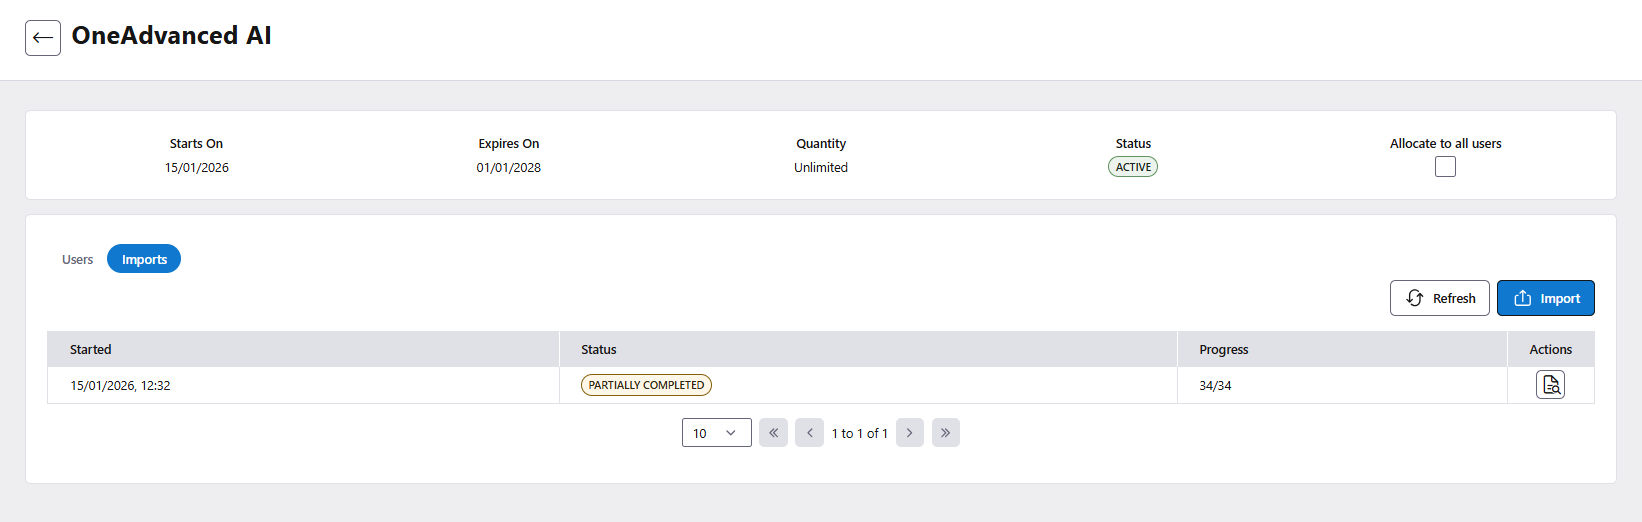
- For more details or errors, you can check details by clicking View under actions.