Contents
Federating Identity with Azure Active Directory

This guide will take you through the steps required to setting up a federation between Identity and Azure Active Directory (Azure AD). It is intended for use by Customer Administrators who will have the required permissions to follow the steps correctly.
What is Azure Active Directory (Azure AD)?
Azure AD is a service from Microsoft that allows users to log in to third-party applications using their normal network credentials, such as the account and password they use to log in to their PC. Allowing a user to log into different services like this is known as a federation, which is when two separate products use the same login details - in the case of using Azure AD and an Advanced product together, the federation takes the login details stored by Azure AD and uses them to authenticate a user on a product that uses Identity. You'll probably have used something like this before, for example logging into websites using your Gmail or Facebook account, or elsewhere where you've signed into a third-party application using your Windows account.
There are a number of advantages to using an Azure AD federation with Identity. For a start, it reduces the number of different passwords a user needs to remember, but you can also ensure that a user cannot log in once they have left your organisation and their ability to log in to services has been removed, without needing to also manually disable their Advanced account(s).
Preliminary steps
Before you begin configuring Identity using an Azure AD integration, you'll need a few key pieces of information:
• An Organisation reference for the organisation within Identity that you'd like users to access
• A name for your organisation's Federation alias
You will also need to access the Azure AD console (a Microsoft cloud service), and you will need to be a Customer admin to access the Organisations page within MyWorkplace.
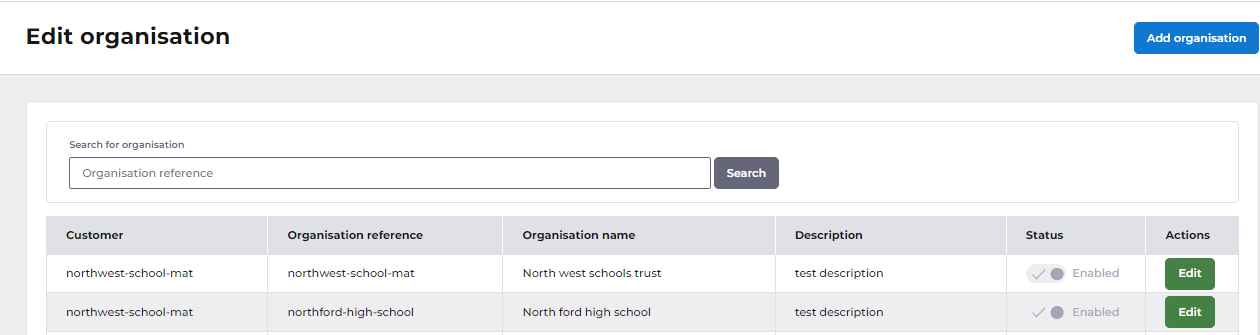
Organisation reference
You can find your Advanced organisation reference by going to Organisations in MyWorkplace (use the link, or find it under Apps on the left menu). You will be shown a list of the Organisations that you have access to. Select the Organisation reference for the Organisation that you want to set up Identity for:
Federation alias
A Federation alias is an identifying name given to Azure AD to allow it to connect to Advanced SSO for your organisation. Each end of the connection uses the Federation alias to identify the connection.
Federation Alias Requirements:
- Must be unique within an Organisation (but not necessarily between organisations)
- Maximum 100 characters in length
- Must be in lower case
- Can contain hyphens (no spaces or special characters)
- Example formats:
azuread,azure-ad,company-azure
It would probably be a good idea to name it something simple, like "azuread" in order to avoid confusion, but any combination of letters can be used as long as it doesn't contain more than 100 characters.
Azure AD Configuration
Creating an Enterprise Application
Now that you have collected all of the required information to set up a federation with Azure AD, it's time to create it!
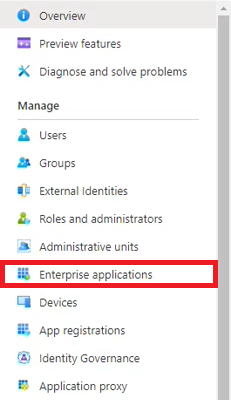
- First thing, open the Azure AD admin centre, and select Enterprise applications from the left-hand navigation bar:
- Next, you need to add a new application. Select the New application in the toolbar at the top of the screen:

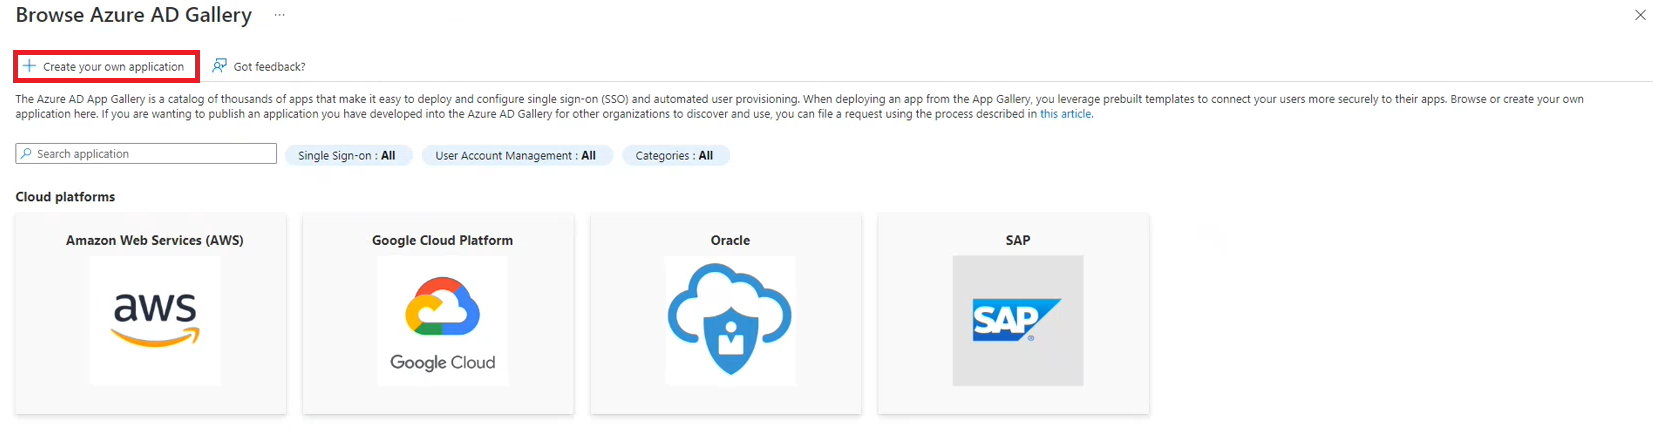
- This will take you to a screen that lets you browse all the premade configurations that Azure AD provide for their users. Identity does not have a premade configuration to choose from, so you need to select Create your own application to set one up:
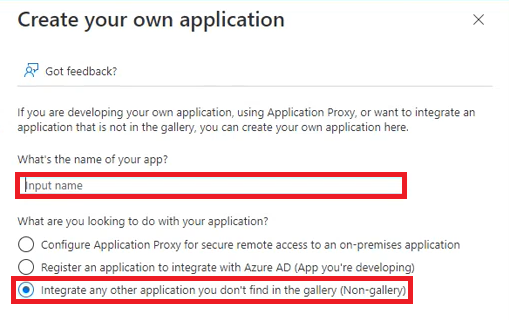
This will open the Create your own application page.
- Decide on a descriptive name for your federation and enter it into the box provided, and then select Integrate any other application you don't find in the gallery (Non-gallery) from the list of radio buttons below.
Configuring Azure AD Enterprise application
This will create your new application, ready for configuring the SSO.
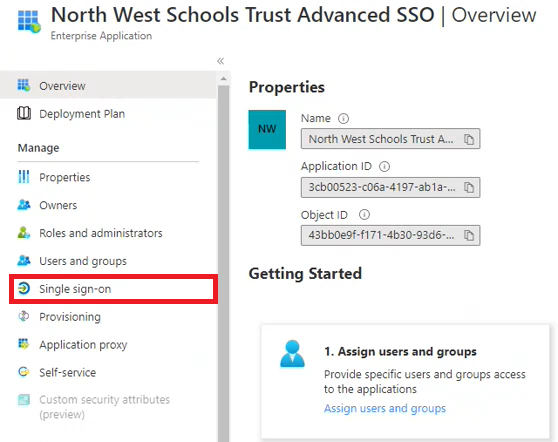
- First, select Single sign-on from the menu on the left:
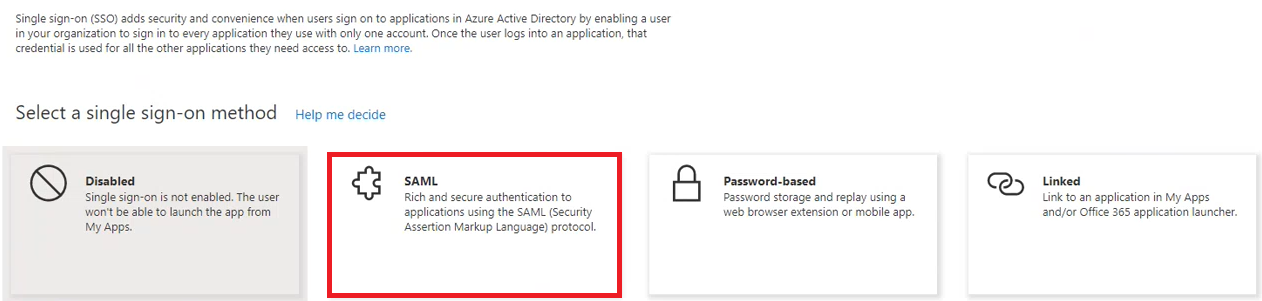
- Click on SAML for the single sign-on method.
After a short loading screen, you will be taken to the SAML configuration page. You will need to edit a few things in the Basic SAML Configuration box.
- Configure Basic SAML settings
You will see the "Basic SAML Configuration" section. Click the Edit button to modify the values.
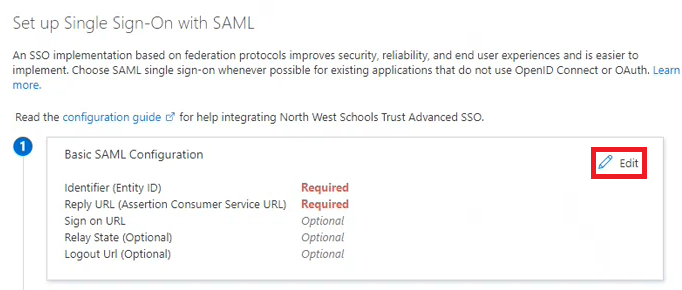
This will open a drawer on the right-hand side that lets you edit the fields and values.
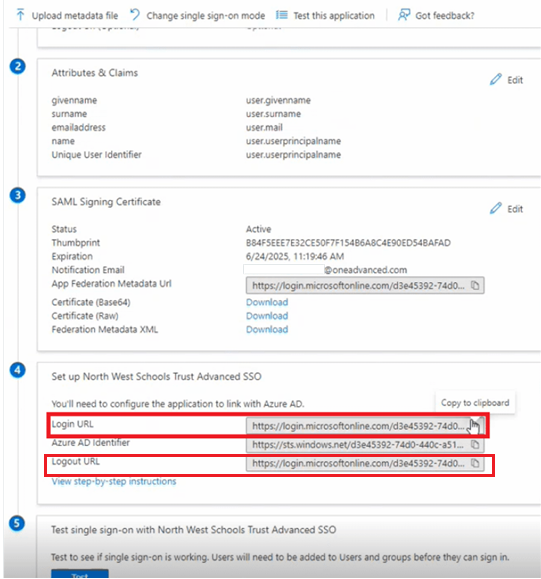
- You need to replace the values for Identifier and Reply URL with the following pieces of information. You will need to alter the URLS with your Organisation reference and Federation alias that you collected earlier, which have been highlighted with square brackets ([ ]):

Field | Value |
Identifier | https://identity.oneadvanced.com/auth/realms/[Organisation Reference] |
Reply URL | https://identity.oneadvanced.com/auth/realms/[organisation Reference]/broker/[Federation Alias]/endpoint |
Logout URL | https://identity.oneadvanced.com/auth/realms/[organisation Reference]/broker/[Federation Alias]/endpoint |
Once finished, select Save at the top of the right-hand drawer.
Before you leave this page, there is some information you need to copy from this page. Scroll down to the section labelled “Set up [Application name]” and copy the values for Login URL and Logout URL (needed when configuring provider at organisation level). Save this for later as you will need it when you come back to MyWorkplace:
Grant access to users
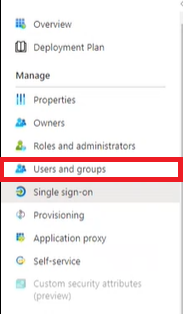
- Next, we'll configure what users can use Advanced SSO to sign in. On the left-hand navigation bar, select Users and groups:
- Select Add user/group on the toolbar at the top:

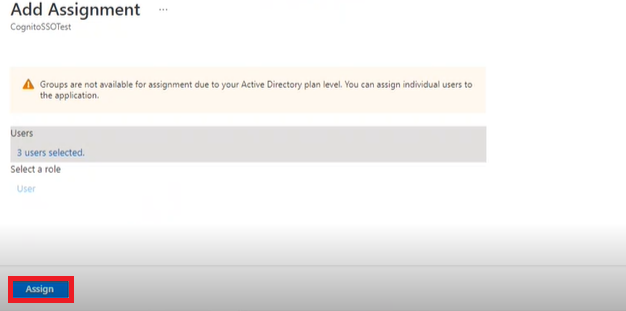
- This will open a new window. On this page, you can search through your registered users and/or groups and add them to a list of users you would like to use the federation. Once you have selected your users, click Assign in the bottom left-hand corner of the page.
Organisation Manager configuration
- Now, you need to set up the federation in MyWorkplace.
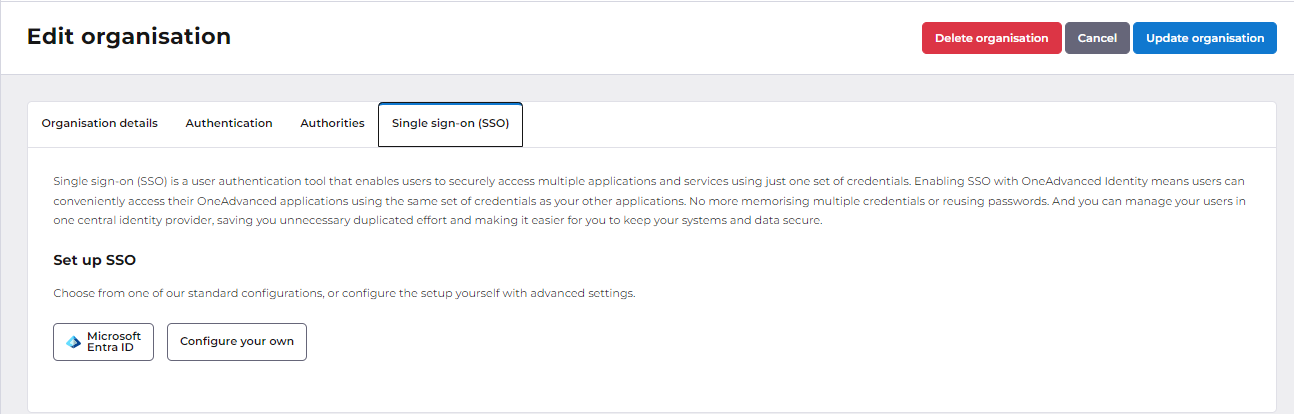
Head back to Organisations in MyWorkplace and click Edit for the relevant organisation.
Open the Single sign-on (SSO) tab. There are two available options here:
- Quick setup using Microsoft Entra ID / Azure AD - this uses a template configuration, and you only need to provide limited information
- A custom configuration using Configure your own - this option allows for more customisation, and the rest of this guide uses this option
Provider tab
- Then, on the Provider tab, you will need to enter the following details into each field:
Field | Value | Note |
Friendly name | Azure AD | This is the label that will go on the button for your login page. You can put anything in here, but keep in mind that it will be the button that your users need to press every time they log in. |
Alias | azuread | This is the federation alias that you chose at the start. It must be identical to the one used in Azure AD, otherwise the connection will fail – double check your spaces! |
First login flow | Automatic pairing or Automatic paring - do not create user | Automatic Pairing When users enter their email address during their first login, Identity will attempt to match it to a federated account. If no existing user is found, a new user account will be created automatically. This user will then require licensing and configuration in any OneAdvanced applications purchased. You can see what that process looks like here. Note:- Authorities must be configured to restrict which email domains are allowed to automatically pair or create users during first login. For more details please check here Automatic Pairing- do not create user When users enter their email address during their first login, Identity will try to match it with a federated account. If a match is found, the accounts will be paired; if not, a new account will not be created. We recommend using this option if you want to control who can log in. It helps prevent unplanned user creation and keeps your user management organised. |
Post Login Flow | asso federation post login with otp or asso federation post login | 'asso federation post login with otp' is the default setting. This allows you to choose whether users need to provide an MFA verification code to Identity, separate to any MFA you have set up for Azure AD. This is controlled by the 'Requires MFA' toggle. The 'asso federation post login' option means users will never be asked to configure or use Advanced SSO MFA. They will only ever use Azure AD authentication. |
Type | SAML/OIDC | This field controls the federation type – as we set up a SAML connection in Azure AD, we want to select the same on MyWorkplace |
GUI order | 1 | If you are using multiple federations, this defines the order in which they will appear. |
Enabled | True | This one turns the federation on – make sure it's set correctly, or all of this will have been pointless! If you ever want to disable federated SSO for MyWorkplace, you can just change this value to 'false' rather than deleting the federation. |
Always use | Enable/Disable | The Always Use setting controls whether users must authenticate only through your organisation’s identity provider (IdP), or whether they can still sign in using their local Identity credentials. Read more about this setting here. Tip: Keep 'Always Use' set to False where Advanced consultants or support teams may require login access. |
Trust email | Enable/Disable | Generally, email addresses provided by an ADFS federation would be trusted because they have been set by an administrator within the organisation. However, if you would like to force email verification within Advanced SSO, this can be set to disable. |
Hide on login page | Enable/Disable | Controls whether this federation (SSO provider) is visible on the login page. When enabled, the SSO login option is hidden. Users cannot initiate login using this federation from the login |
Single sign-on service URL | The URL to your Azure AD endpoint | This is the URL you saved after setting up your Azure AD application. Must be an HTTPS URL for security compliance.  |
Single logout service URL | To ensure users are fully signed out of the application, you must correctly configure the Logout URL as part of your SAML federation setup. The Logout URL should be set to your identity provider's SAML Single Logout Service endpoint (typically something like https://{your IDP provider}/saml/logout. Without this configuration, users may remain logged in even after clicking logout, especially on shared or personal devices.  | |
Backchannel Logout | Enable/Disable | Enabled: When a user logs out from the identity provider, a backchannel request is sent to log the user out of this application as well. Disabled: Logging out from the identity provider will not log the user out of this application. |
NameID Policy format | This will set each user's Identity username to a random string, but it will ensure that name changes (such as after getting married) will be consistent between Identity and Azure AD . Changes made in Azure AD will be automatically migrated to Advanced SSO. Persistent: A permanent, unchanging identifier for each user. Recommended for most use cases. Transient: A temporary identifier valid only for the current session. Use if long-term tracking is not needed. Email Address: Uses the user's email as the unique identifier. Unspecified: Lets the identity provider choose the format. May result in unexpected behavior. | |
HTTP-POST binding response | Enable | Enables receiving SAML responses from your identity provider using the HTTP-POST binding method. Its recommended to Enable this |
HTTP-POST binding for AuthnRequest | Enable | Enables sending SAML authentication requests to your identity provider using the HTTP-POST binding method. Its recommended to Enable this |
Force authentication | Enable/Disable | Enabled: Users are required to log in again at the identity provider, even if they are already signed in. Disabled: Users may be automatically logged in using an existing session with the identity provider (SSO). |
Validate Signature | The system verifies the signature of the response to ensure it is authentic and has not been tampered with. |
Once these details have been entered, click Create at the bottom right-hand of the screen. This will save the federation details.
Mappers
Mappers are used to move data from certain fields in Azure AD to match them with data in Advanced SSO. We only need to provide three.
- To add a mapper, select Add mapper in the Mappers tab, enter the details, and select save. Create the following three mappers:
Name | Mapper type | Attribute name | Friendly name | User attribute name |
Last Name | Attribute importer | http://schemas.xmlsoap.org/ws/2005/05/identity/claims/surname | Last Name | lastName |
Given Name | Attribute importer | http://schemas.xmlsoap.org/ws/2005/05/identity/claims/givenname | Given Name | firstName |
Attribute importer | http://schemas.xmlsoap.org/ws/2005/05/identity/claims/emailaddress
|
Once these mappers have been created and saved, select Save federation at the bottom right-hand corner of the screen to close the federation edit page.
Congratulations! You and your users are now ready to use Advanced SSO in MyWorkplace. Try signing in once you've finished the last step. Double check that your First name, Last name and Email have been set correctly by checking in Users.
Troubleshooting Tips:
If users cannot sign in:
- Check the Alias - Ensure it matches exactly between Azure AD and MyWorkplace (including spaces)
- Verify URLs - Make sure the Identifier and Reply URLs have no spaces
- Check User Assignments - Ensure users are assigned to the application in Azure AD
- Review Mappers - Verify that mapper attribute names are correct and have no spaces